Probably things like the following have been done by the "gurus" too numerous times to report them - but when the (borrowed) 20er in my basement played my own arrangement directly from my laptop on (almost) the first attempt, I felt somewhat proud!
The following gives a short explanation of the various parts. A more detailed explanation, also regarding the sources of the parts, can be found when following the links:
However, one other thing I had to create is a program that reads the MIDI file output from the notation program (I use Noteworthy Composer) and makes it "paper-strip like":
I wrote the program in Java - first of all, in my "other job" I'm a professional software engineer working almost exclusively with Java; and additionally, Java (in its version 1.3) has a complete MIDI library which makes reading, handling, and writing MIDI messages very simple.
And then I concatenated all the arrangements I had done last year (without an organ ...) into one large file and listened to them.
Oh yes - why did I do all that? Well, my arranging is not yet world-class, so-to-speak, and wasting a punched paper roll for every variation is out of the question (money-wise and time-wise). So I plan to hone the arrangements via the computer set-up - but have them punched in good old paper when I'm finally satisfied! And the same midification will therefore also go into the 26-scale organ that will come from Jäger and Brommer somewhen this year ...
P.S. The funny thing when playing directly from a computer is that you cannot influence the tempo - you can even stop turning for a short moment. You lose your ability to turn steadily very quickly ... therefore, I do not recommend this setup by default. The "professional" method is to measure the speed of the crank and play the MIDI notes accordingly - but as I need the computer connection only for my own "arrangement training", I'll not add this twist (it would mean (a) changing the organ; (b) building hardware and software that sends the tempo information to the computer; (c) writing a sequencer of my own that outputs the MIDI notes at a variable speed according to the tempo information. Others have done that, much more professionally than I can do it ...).
1. My computer is a Laptop running WinNT - no game port, no Windows 9x - definitely a bad choice for doing MIDI. But I have only this one. I was told that the MIDI support under Windows 9x (and, of course, even more on the Macs) is much better. The music program I use is Noteworthy Composer (www.ntworthy.com; if you want to see what can be done with it, go to Ramon Pajares' classical page at www.nil.es/rpajares/index_e.htm). Cost: USD 39.
The Java program I wrote simply reads a MIDI file (created by Noteworthy), does a little(!) "something" (explained in a moment) and writes out a MIDI file again. Then I play the output MIDI file with the standard Windows Media Player, after changing the "standard MIDI device" to the Midiman driver. For simple testing of an arrangement (or the machinery described here), I simply let Noteworthy use the BiPort driver to output its MIDI directly to the BiPort.
The Java program comes in when I want to create a MIDI version that is as near to a "paper-punched" thing as possible, as follows:
With Noteworthy, it is possible to define different playing lengths for a note - staccato, legato, "bound staccato", "portato". Moreover, you can of course connect 1/32 and 1/16 etc. to get exactly the note length you want. However, there are two small problems - one with Noteworthy, the other with organs in general:
Both "corrections" also ensure that the final paper strip and the MIDI-produced music sound as similar as possible (except for some very minor other effects which I won't describe here ...).
1. and 2. above can produce a conflict, e.g. when in a trill notes have to be lengthed by 2., but then come too close together for 1.. Then the program outputs an error message, and one has to change the arrangement (make some decoration like a trill slower, slow down the hole piece, or - most of the time - connect two notes to a single one).
That's all there is to it! Actually, I found that writing the notes of an arrangement takes about half the time - the other half is "making music out of it", i.e. editing the note lengths. My classical organ training helps somewhat with that ...
2. Because of the Laptop+WinNT combination, I have to use a Midiman Biport 2x4 that connects to the serial port on the laptop (www.midiman.com or www.midiman.de - however, the products are usually cheaper at resellers. I got mine from www.musik-produktiv.de). Cost around DEM 320 / USD 180.
A better (and cheaper) set-up would probably be to have a MIDI card directly in the computer and use Win 9x/2000 or a Mac. With Win 9x/2000, you can also use a Midiman Portman/S on the serial port, which costs about half as much as the BiPort (but has only one output - however, how many organs are you going to play in parallel :-) ?)
3. The MIDI cable is a home-made cable - you need two DIN jacks with 5 pins, where you connect only the two "diagonal pins" (pin 4 and 5). Don't reverse the polarity - I did, which cost me 2 hours of "debugging time". Cost around DEM 4 / USD 2
4. The MIDI-to-parallel board is an MTP-3 from John Wale in England (www.jwelectronics.free-online.co.uk). The MTP-3 has 28 note outputs and 4 "program change" outputs - these will be used in my future organ to switch on/off a second register. There is also the MTP-1, which has 32 note outputs. All the boards are "chain-able", i.e. you can have e.g. 56 notes played by two MTP-3's - but for me, a single board is enough. John does the mapping from MIDI notes to the outputs according to your specification. Cost around GBP 60 / DEM 250 / USD 130.
5. The cable from the MTP-3 to the organ valves is a simple 25-strand computer cable, with 25-pin jacks at the ends. Another DEM 4 / USD 2.
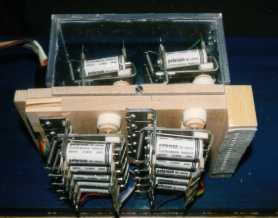
6. On the tracker bar, there sits a little wooden board (size about 12cm x 15cm - 5" x 6") with channels from the tracker bar to the vavles. The tricky thing here was to pack the valves so tightly that the channels are near enough for the tracker bar - about 3.8mm, a little more than 1/8" apart. Here is a quick drawing what the board looks like (click on the image to get a full-size drawing):

The organ valves are Series II valves (90 ohm coil, 5/8" pallets - the smallest they have) from Peterson in Illinois (www.petersonemp.com - the "emp" is for "electro-musical products"). Each valve takes up a space about 2" long, 2" inch high and 5/8" wide (5 x 6 x 1,6cm). They cost about USD 4 each (in Germany, you have to add import sales tax and customs, together about 20%). Laukhuff (www.laukhuff.de) in Germany has similar valves, however, they cost about DM20 each (excl. VAT) - more than twice the Peterson ones.
Remark: I do have a medium-equipped wood-shop in my basement (my other hobby is wood-working (my third one is railroads - here's a short story on how I work: My son Lukas, 6, and daughter Katrin, 4, usually don't allow me to work in the basement - only if they also get something. So, when I built the MIDI machinery, I also built a 3 track model railroad yard for Lukas, two or three small wooden houses for both of them, and moreover I supervised them when they drilled numerous holes in various scrap wood and glued them together and put in screws and hit hammers on their fingers etc.etc. - in addition to repairing Christmas decoration, rebuilding American 110V Christmas lights to 220V - you get my way of working ... But after 8 in the evening, I can work uninterrupted :-) - ok, back to the organ - ). Building the board means quite exact work - the better your equipment, the easier. My drill press is a little wobbly, but the bandsaw (buy one if you do woodworking in earnest! - for around DM1000 / USD400 you get serious ones) has Timberwolf blades from the US and is precise - I can slice a 0,3mm sheet off a piece of wood!
Building the board took about 4 hours "net time", which came to about 2 days (mainly evenings) between Christmas and New Year.
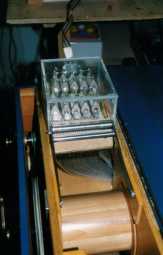
7. ... and finally, there's the organ: It is a 20er similar to 20er Raffin's which I have until I get "mine" from Jäger and Brommer in Waldkirch somewhen this year. The 20er organ does not have a builders plate or a number, and Mr. Brommer does not know who built it originally - it is painted in the "Deleika blue", but is built a little sturdier than the other Deleikas I've seen (e.g. with two solid roller bearings for the crank axle).
That's it - yes, one more thing: All the people and companies mentioned were really helpful - John Wale, William Hass at Peterson, the people at Midiman and of course Wolfgang Brommer in Waldkirch. That was a good experience!
© 13.5.2001 HMMüller